
Essential Micro Soldering Tools
Microsoldering is not an easy job. To do it without the proper micro soldering tools and equipment is even harder. In the article below, I’m going to detail all of the tools and equipment that you’ll need to get started.
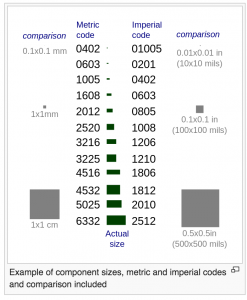
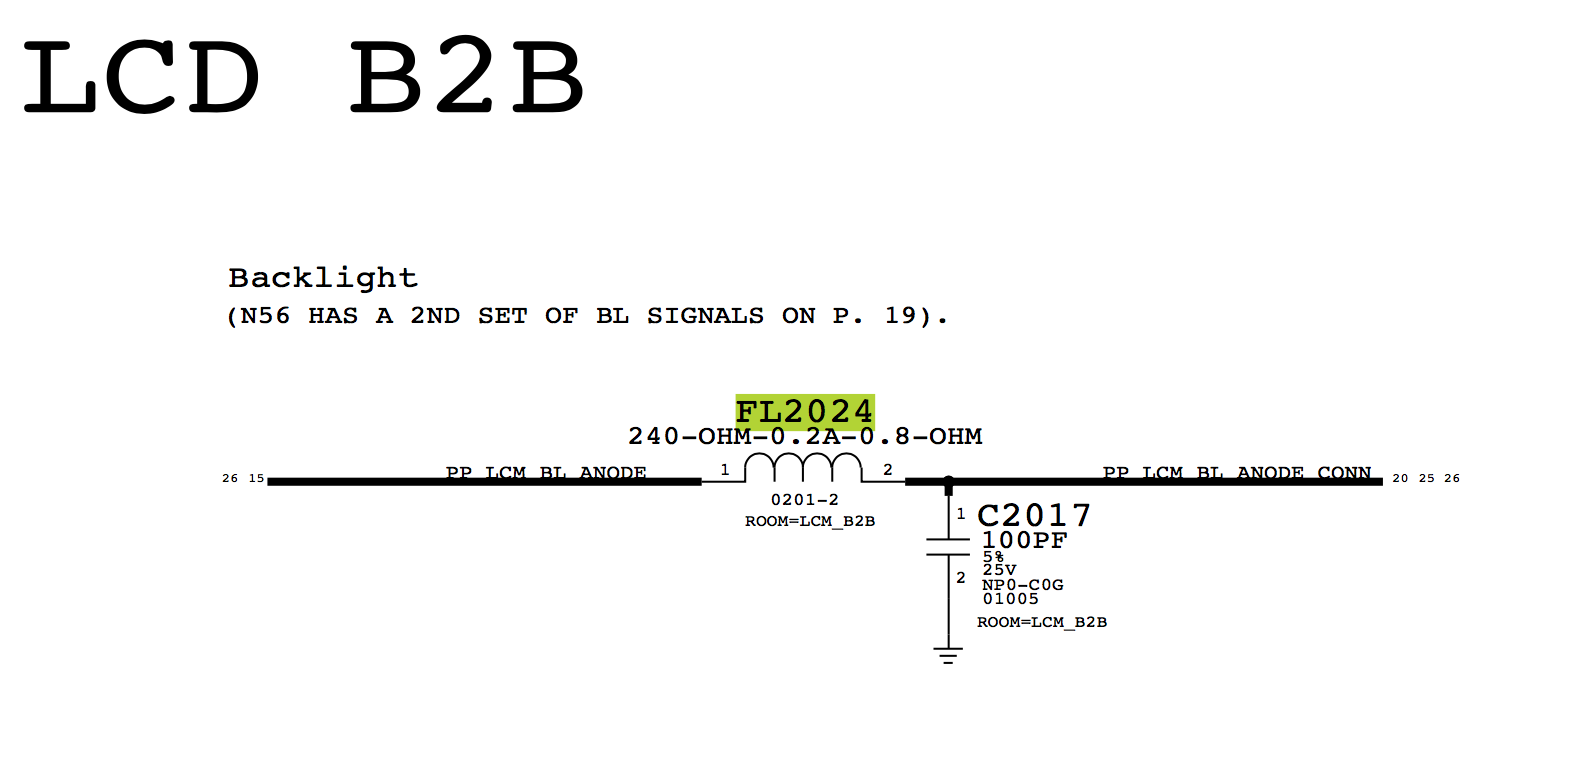
The definition of micro soldering is being able to solder thruv lightough a microscope because the components are so small that they’re almost impossible to see without one. Just to get an idea of how small these components are, here is a chart of the surface mount components commonly found in iPhones and iPads:
In the schematics, you’ll see each component identified along with their size, similar to this:
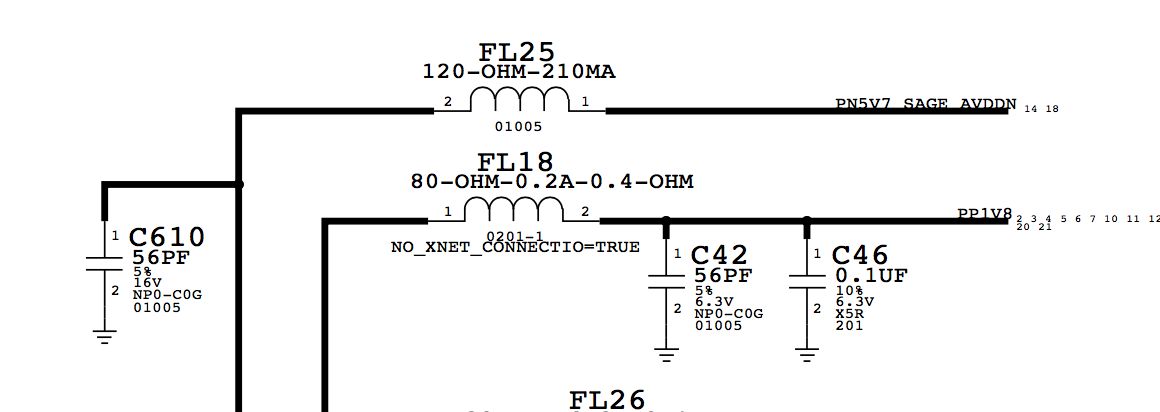
For FL25, which is a filter (inductor), you can see that the component size is 01005 (displayed at the bottom). Looking at the wikipedia chart above, under “imperial code”, you can see that that this is the smallest surface mount component made. The black rectangles in the size chart above is the actual size of the component, so now you can see how trying to solder one of these components on a logic board is nearly impossible without a good microscope.
Micro Soldering Microscope
So, what do you need to know about buying a microscope? Do you need a barlow lens, a boom stand, an objective lens, 2x/4x, trinocular, simultanous focus, etc? Unless you already own a microscope, it’s so overwhelming trying to figure out what you actually need for smartphone and tablet repair.
You’re in luck because I’m going to help you with deciphering the different kinds of microscopes used for microsoldering.
I would definitely stick to Amscope. It’s best to buy it through Amazon. The 0.5x barlow lens will give you a greater working distance between the scope head and your workbench.
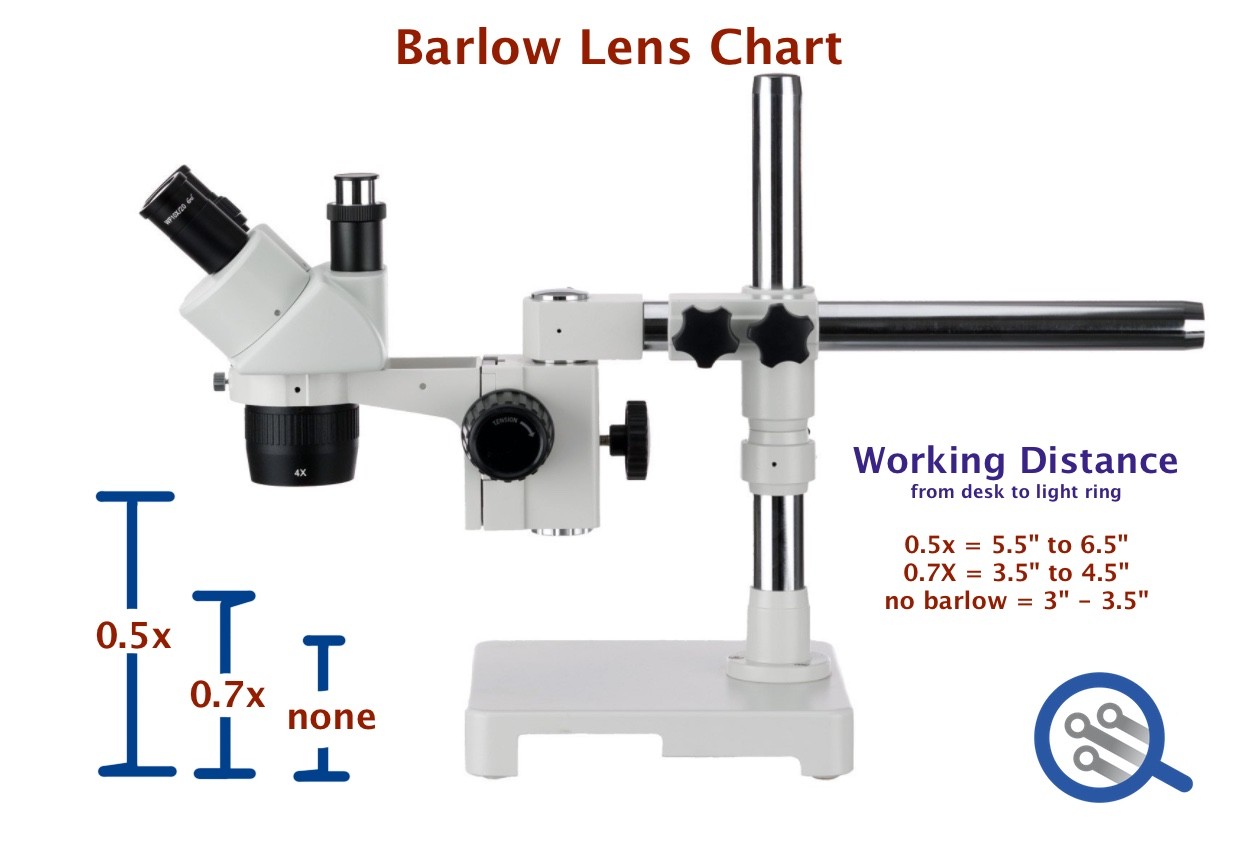
The 0.7x-4.5x zoom objective will allow you to zoom way into the logic board, so that you can see what you’re soldering. This zoom objective range is standard for pretty much all microscope heads. The eyepieces and the barlow lens is what changes the magnification from 0.7x to 0.35x (0.5x barlow) or from 4.5x to 9x (2x barlow), which is why you’ll see 0.35x to 9x as the magnification range for some microscopes.
The trinocular port will allow you to record videos through the third eyepiece. And the most important thing is the simultaneous focus, which will allow you to see through both eyepieces AND record video through the trinocular port without closing off one eyepiece. Without simul-focus, you’ll only be able to see out of one eyepiece while recording video. The above scope doesn’t come with a digital camera or a light ring, but you can get a cheap light ring on ebay for around $10-$20. I would definitely recommend getting a light source when you order the scope.
Here is the microscope that we recommend:

AmScope SM-4TPX Professional Trinocular Stereo Zoom Microscope with Simultaneous Focus Control, WH10x Eyepieces, 3.5X-45X Magnification, 0.7X-4.5X Zoom Objective, Ambient Lighting, Double-Arm Boom Stand, Includes 0.5X Barlow Lens
$616.99Here are some other alternatives:
- Parco Scientific PA-5FX Microscope – $430 (Huge discount from the comparable Amscope, but the oculars are not as good!)
- AmScope SE400-Z – $184 (I think you’ll regret buying this one)
- AmScope SM-3BX-80S – $460.99 (same as above without the trinocular port)
- Parco Scientific Binocular Microscope – $399 (Parco Scientific is the Amscope alternative)
- AmScope SM-4TX – $419 (same as the above, but without simul-focus)
- AmScope SM-4TPZ-FRL-5M – $699 (same as above, but comes with a 5MP camera and a light source)
- Parco Scientific Simul-Focal Trinocular – $580 (with light source, barlow lens and 5MP camera)
- Search for Amscope Professional Trinocular Simultaneous Focus Microscope at Amazon Warehouse
- Search for Amscope Professional Trinocular Simultaneous Focus Microscope at Amazon
Micro Soldering Rework Station
Every micro soldering technician needs a good rework station. What’s a rework station? A rework station usually comprises of at least a soldering iron and a hot air gun. You can buy a cheap X-tronic or Aoyue hot air station on amazon, but I think the way to go would be a good Hakko. They’re not too crazy expensive, they work a lot better and they tend to last a lot longer than the cheaper alternatives. I would also recommend buying separate stations for your soldering iron and your hot air. The stations that are combined tend not to work as well. You’ll probably want to add a good microsoldering pencil or micro-tweezers after you get the rework station. This will help with the extra small 0201 and 01005 smd components.
Without further ado, here are my recommendations for a good rework station:
Quick 861DW 1000W Digital Rework Station with LCD Display
$326.98 JBC NASE-1C Nano Rework Station 2 Tools
$1,890.00If you’re looking for cheaper alternatives, then these are also great:
Hakko N3-08 0.8mm Nozzle for FM-2024/FM-202/FM-203/FM-204/FM-206
Hakko FM2023-05 SMD Mini Tweezer with T9-I Tips and FH200-04 Stand for the FM202 and FM203 Stations
$326.27These are the micro soldering equipment that I recommend, but I know price may be a factor, so here are some alternatives.
Micro Soldering Hot Air Stations
Here’s a new and upcoming hot air rework station that seems to be comparable to the Quick 861DW:
ATTEN ST-862D Lead-free Hot Air Gun Soldering Station Intelligent Digital Display 1000W ST862D Rework Station For PCB Chip Soldering Repair
$246.00- JBC Tools JT-1QD Hot Air Station – $1,300 (I can’t get myself to spend this much on a hot air station, but this is the one that I would get if it made sense.)
- Kohree Hot Air Station – $59 (I’ve never used this, but great reviews on Amazon)
- Quick 957DW+ – $120 (I have one. It’s good, but I would spend a little extra to get the Quick 861DW because that one has 3 programmed channels. The good thing about this station is that it works with the Aoyue and Hakko tips.)
Micro Soldering Iron
- JBC Soldering Tools NASE-1C – $1,300 (This is what I use. If you have the budget, then don’t look any further.)
- Hakko FM-203 dual port soldering station with FM-2027 – $494 (Dual port system that supports the FM-2027, FM-2023, and FM-2032)
- Hakko FX-951 – $236 (Doesn’t work with the micro-tweezers though)
- Aoyue 937+ Digital Soldering Station – $60 (Great heat distribution.)
- Hakko FX-100 Induction Microsoldering Station– $299 (never used)
Micro Soldering Multimeter
A digital multimeter is essential for logic board repair. You don’t really need anything fancy, since most of what you’ll be dealing with is low voltage (~5V) and you’ll be testing for continuity, diode mode, resistance, voltage, and sometimes capacitance. Sure you can get one of those awesome, but expensive Fluke multimeters:
Fluke 117 Digital Multimeter, Non-Contact AC Voltage Detection, Measures Resistance/Continuity/Frequency/Capacitance/Min Max Average, Automatic AC/DC Voltage Selection, Low Impedance Mode
But the truth is, it’s probably overkill for microsoldering. Personally, I use the Uni-T UT139C. It costs around $40 at Amazon and it has pretty much every feature that you’ll ever need for microsoldering. The bonus about the UT139C is that it also comes with a thermocouple which measures temperature. I use this to calibrate my hot air rework station. Other than that, it’s just like any other digital multimeter and it’s fairly accurate.
UNI-T Digital Multimeter Tester UT133A, AC DC Voltage Current Dmm Multimeter 6000 Counts Auto Ranging NCV Measures Volt Amp Ohm Capacitance Frequency Temperature, Continuity Diode Test, Palm Size
$32.99You’ll also want some super fine multimeter probes:
Multimeter Probes with Super Fine Tips
$9.99Micro Soldering Software
ZXW Tools is the micro soldering software that tells you what each component is connected to on the logic board. In a way, it’s better than schematics because with the schematics, you still don’t know where each connection is made on the logic board. For example, the backlight on an iPhone 6 is out, but it’s not the backlight filter, so what component is next after the filter?
You can search the schematics for what’s next in line, then go back up to the top where the drawings are located, but that’ll take forever when working in real life. With ZXW Tools 3.0 , you can see what component is next in line very quickly.

Here’s a link to setup and install ZXW tools. We sell the ZXW Tools serial number to access the software in our online store. You can download the software for free, but it will not work without the serial number and password. The software is updated automatically via the internet with the latest iPhone versions, so you’ll always have the most recent schematics. Remember that you must purchase a new subscription every year. This tool is essential for iPhone repair.
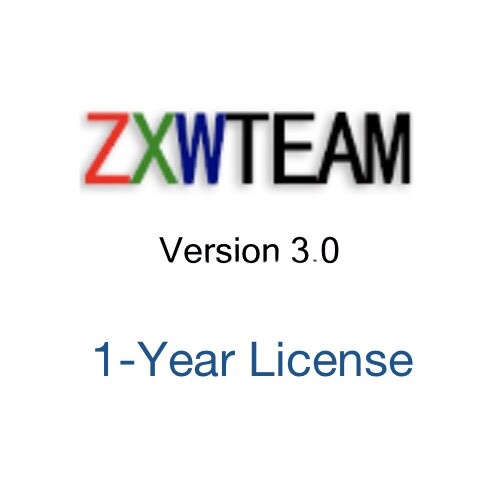
ZXW Tools v3.x 1-year License
$69.99Solder, Flux, Isopropyl Alcohol, etc.
Now that you have your microscope and a good soldering rework station, the next step is to buy some solder, maybe some solder paste, some good flux, and a jug of isopropyl alcohol. This could also be a little overwhelming because there are so many different types of solder and fluxes.
For solder, most newer devices use lead-free solder, which have a much higher melting point. The higher the melting point, the harder the solder is to work with. For most microsolderers, we replace the lead-free solder with leaded solder when we’re replacing smd components.
I stole this chart from Kester (big company that produces solder):
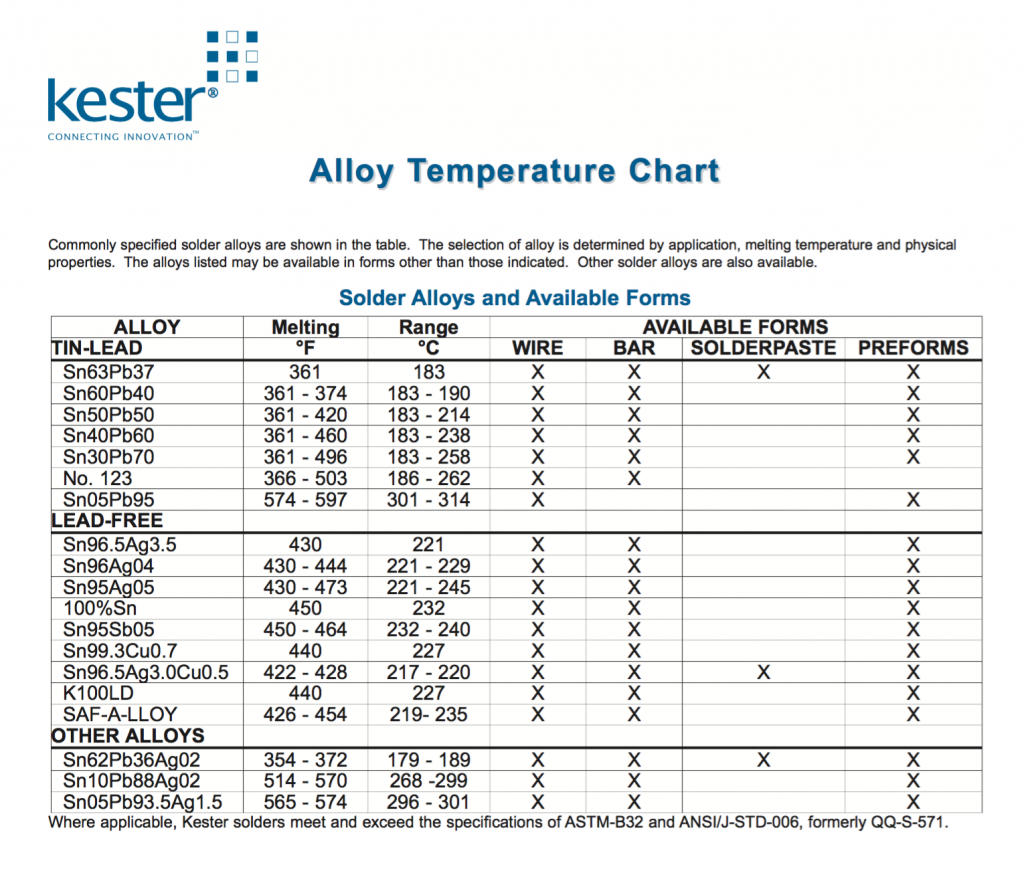
As you can see from the chart, lead-free solder melts at roughly 220 °C and leaded solder melts at 183°C and higher. “Sn” is tin and “Pb” is lead. The standard solder that most microsolders use is Sn63Pb37, which is 63% tin and 37% lead. How much solder will you actually need as a microsolder? Very little. Depending on your volume, one little stick will probably last you a good while.
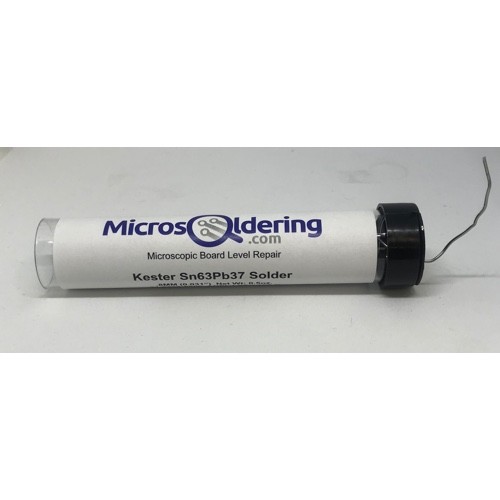
Kester 63/37 Tin/Lead Solder 0.5oz 0.031″
$9.99In addition to some 63/37 leaded solder, you’ll probably want something to help you remove existing chips, like Chipquik. Chipquik is a low melt solder that melts at 58°C. Using Chipquik allows you to remove existing chips without applying too much heat to the surrounding components. The way it works is that you apply a little bit to the end of your soldering iron, then mix it into the solder on the component, which lowers the melting temperature of whatever solder is already on it, usually lead-free solder. Once the melting temperature is lowered, then it’ll be a lot easier to remove the component from the board.
You can also buy this low melt solder paste that we have in our store. This is the stuff that we use:
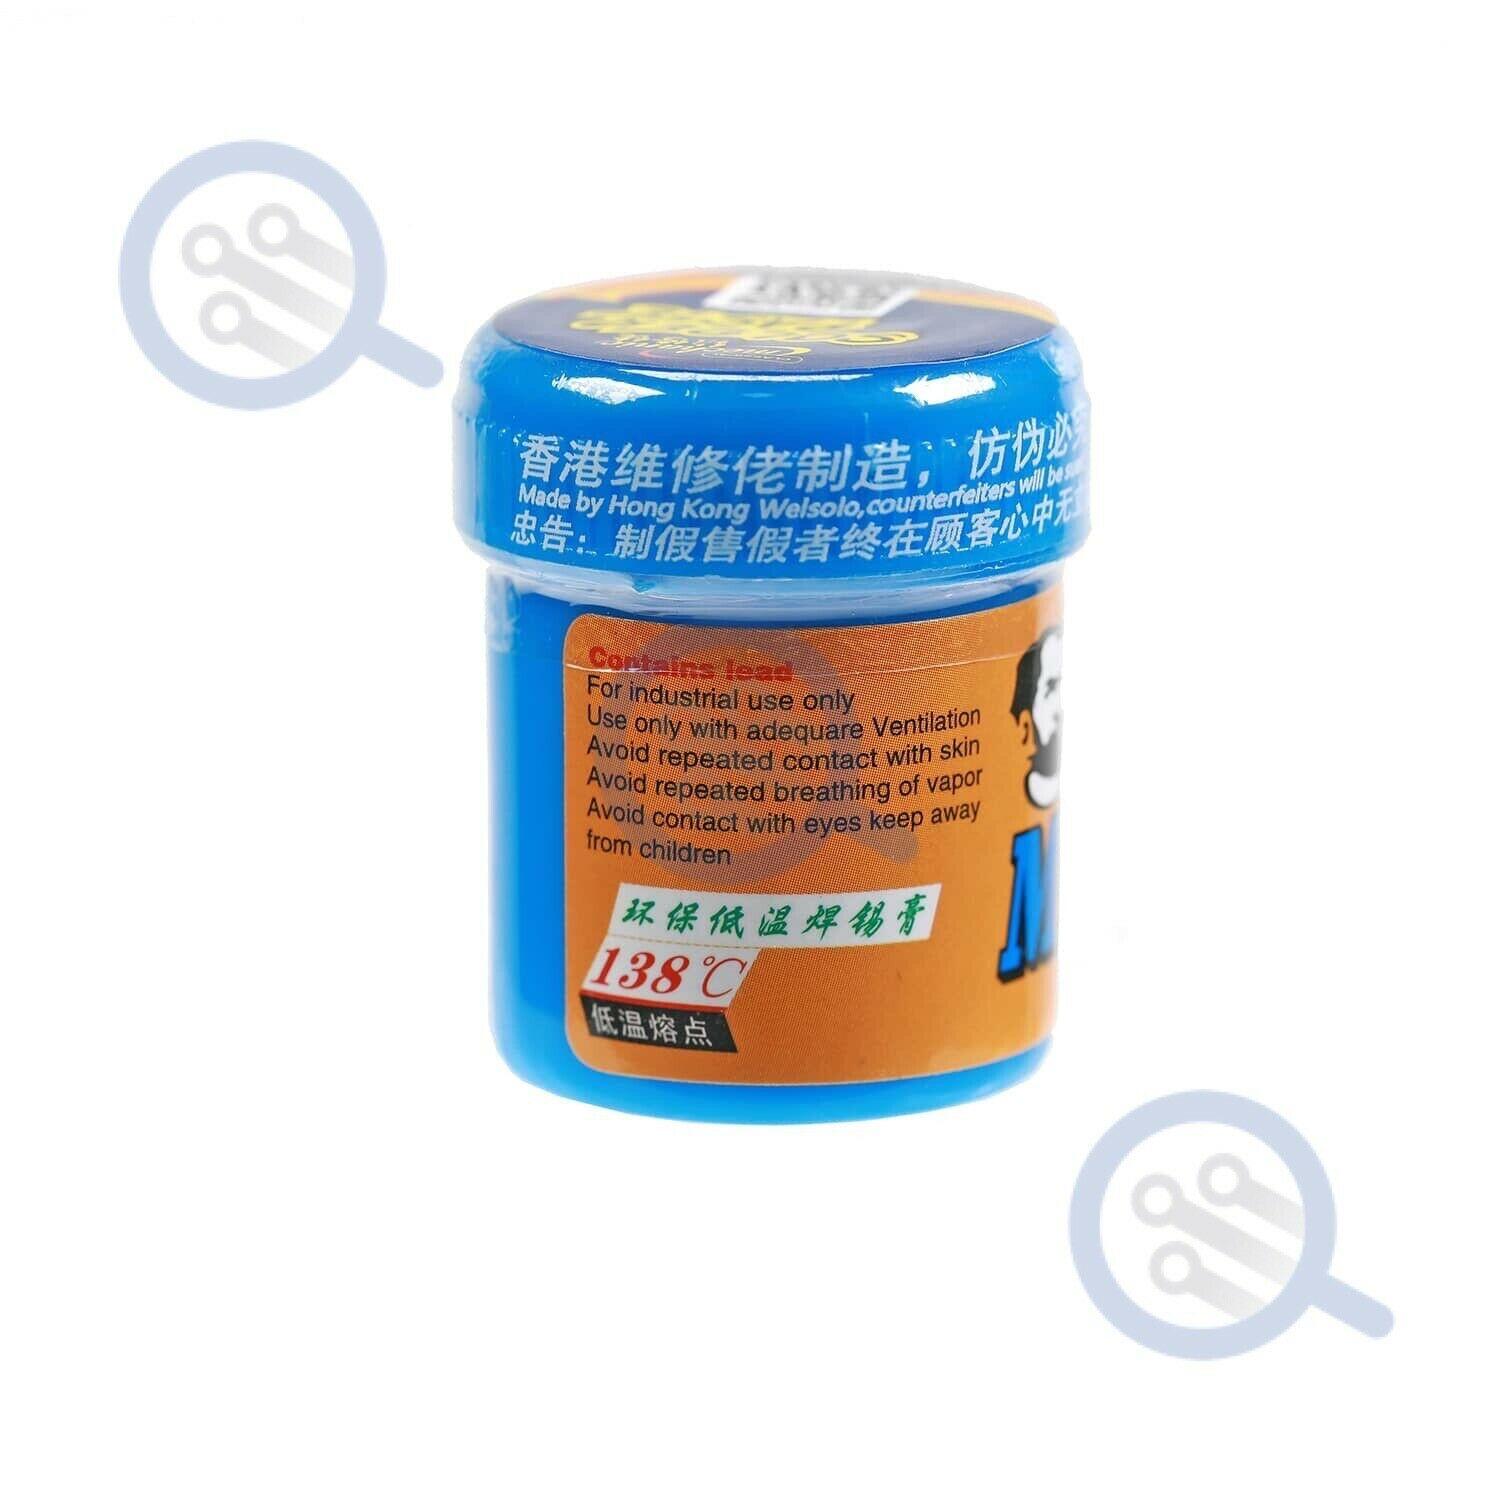
Mechanic Low Melt Solder Paste Sn42/Bi58 138°C
$11.99Solder paste is also good for removing chips or connectors due to it’s low melting point. The low melt solder paste above melts at 138°C — much less than leaded solder, but not as low as Chipquik. The idea is the spread the low melt solder paste on the legs of the connector to reduce the melting temperature of the lead-free solder, so that it’s easier to remove the connector with hot air. SRA low melt solder paste does the job. I prefer Mechanic brand low melt solder paste though.
What is solder paste?
Solder paste is essentially liquid solder in the form of little balls.
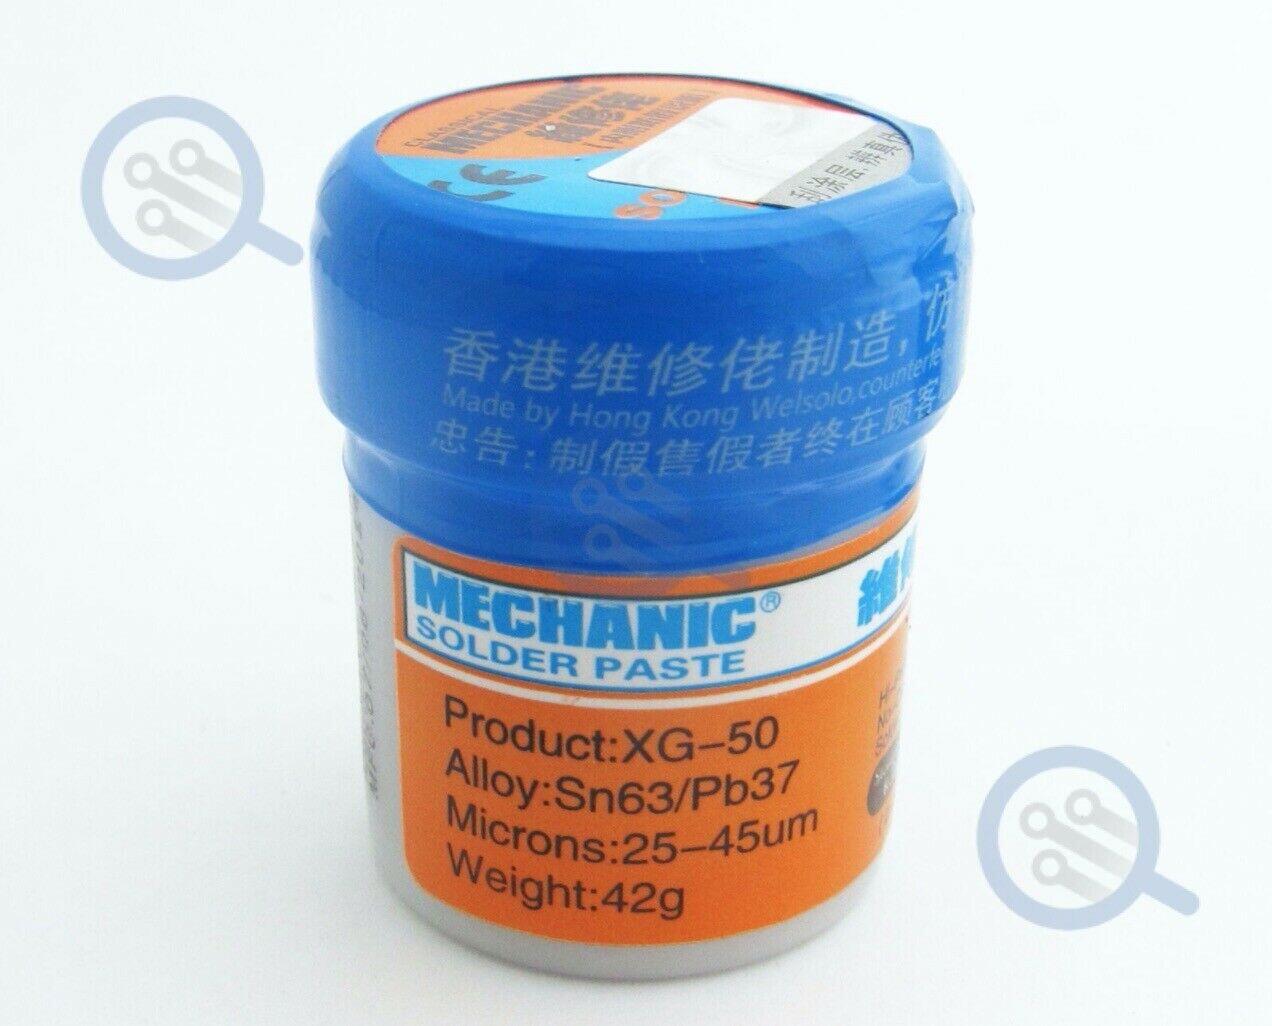
Mechanic Sn63/Pb37 Solder Paste 183°C
$9.99Solder paste comes in the form of a tube and comes mixed with flux. Solder paste is great for instances where it’s easier to use a hot air gun than a microsoldering pencil or micro tweezers. For instance, pry damage near the battery connector on an iphone 5. It’s almost impossible to access the 01005 filter with anything but a hot air gun and some solder paste.
What is solder flux?
Flux is a yellow like substance that helps the solder flow onto the smd components more easily. Think of flux like this…if you put oil in water, the oil won’t mix very well, but if you add a little bit of detergent (flux),then the oil and water will eventually mix together. Flux is necessary for making a good strong solder joint. It helps the solder flow onto the smd component.
There are many different kinds of flux. My favorite? The Amtech NC-559-TF Amtech VS-213-A-TF. Make sure that you buy from a reputable ebay dealer or online shop because there are a lot of fakes out there. A 10CC tube should cost about $15 and 30CC should cost about $25. Anything less that ships from China is probably not the real stuff.
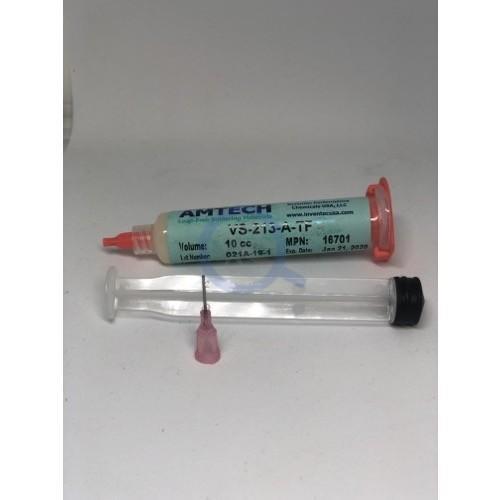
Amtech VS-213-A-TF Tacky Flux 10cc w/Plunger and Tip
$17.99One 10cc tube should last you a long while depending on your volume. You can buy this from our online shop.
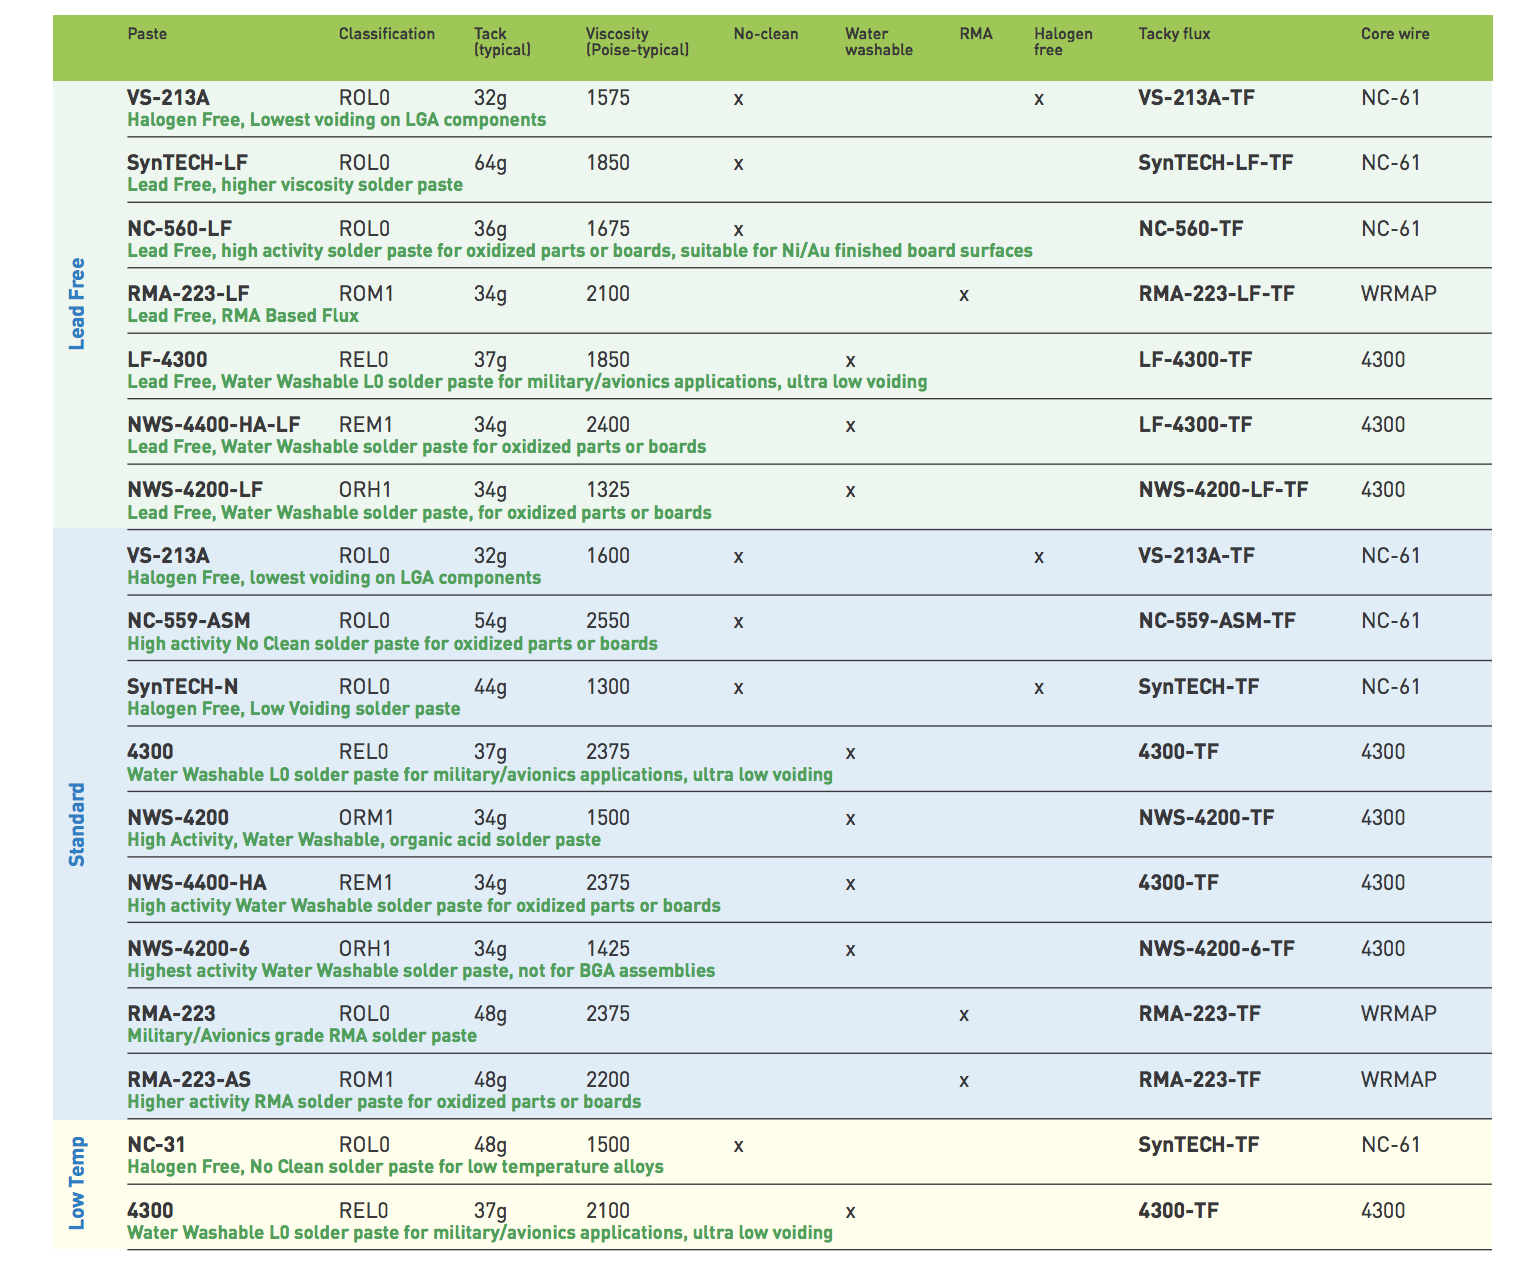
Here’s a chart from Amtech that kinda describes all of the different kinds of flux:
How to fix missing pads?
After soldering components, you’ll inevitably run into missing pads. In order to fix missing pads, you’ll need to use ZXW tools to trace the nearest connected point and run a micro jumper to the affected pad. You’ll want some very thin jumper wire to do this. Something like the below:

0.02mm Copper Jumper Wire
$6.99What is UV solder mask?
UV curable solder mask is essential for “masking” exposed surfaces that have been worked on. This green liquid solidifies once UV light is introduced to it. It’s easy to apply and cures quickly.
Here’s the stuff that I use:
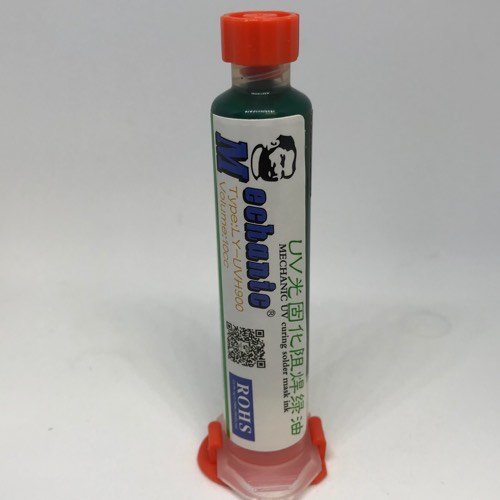
Green UV Curable Solder Mask
$5.99 wendeekun USB Powered 395nm Flashlight,LED Glue Curing Flashlight,UV Black Lights,5V 10W LED Lamp 3 Gears for Phone PCB Repair Resin Curing
$15.07
How to clean solder flux?
You’ll need some isopropyl alcohol too. Preferably something with 99% alcohol or higher. Isopropyl alcohol is used to help dissolve the flux, so that you can scrub it off of the logic board or wipe it off with a KimWipe. It is alcohol, so it’ll evaporate. It’ll also help you clean off the logic board without leaving a corrosive element like water. You can buy a bottle at your local walmart or computer store (Microcenter) or at Amazon.
Amazon Basics 99% Isopropyl Alcohol First Aid For Technical Use,16 Fluid Ounces, 1-Pack (Previously Solimo)
$8.37 ($0.52 / Fl Oz)Some other random micro soldering tools and equipment that you’ll probably want to have on hand:
LONGFITE Large Silicone Counter Mat 19.68x15.74 inch Multipurpose Table Placemat Countertop Protector Baking Pastry Mat Nonstick, Nonskid and Heat Resistent (Large, Blue)
(6 Pack Value Bundle) KCC34133 KIMWIPES Delicate Task Wipers, 11 4/5 x 11 4/5
$562.85 ($93.81 / Count) (as of July 5, 2025 07:16 GMT -05:00 - More infoProduct prices and availability are accurate as of the date/time indicated and are subject to change. Any price and availability information displayed on [relevant Amazon Site(s), as applicable] at the time of purchase will apply to the purchase of this product.)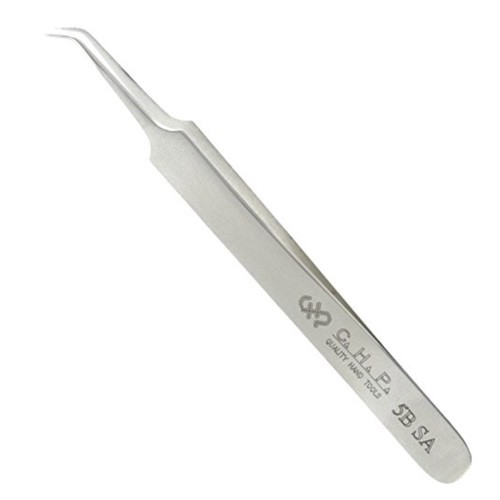
Hakko 5B-SA Curved Micro Tweezers
$9.99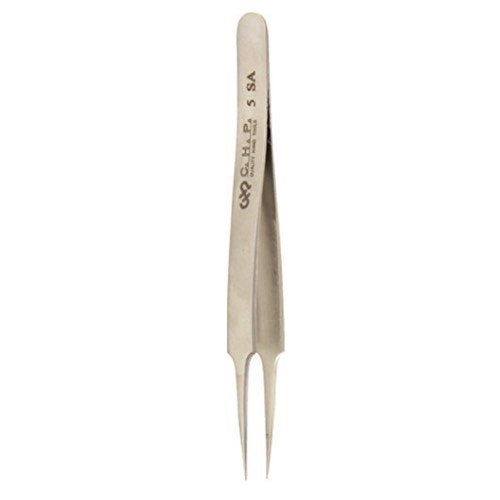
Hakko 5-SA Straight Micro Tweezers
$9.99 iFixit Precision Tweezers Set - Extra Fine, Angled, Blunt Tips for Electronics, Hobby, Industrial, Professional, Craft
TekLine Gold Kapton Tape Polyimide High Temp 3/4" (19mm) x 36yds
$14.53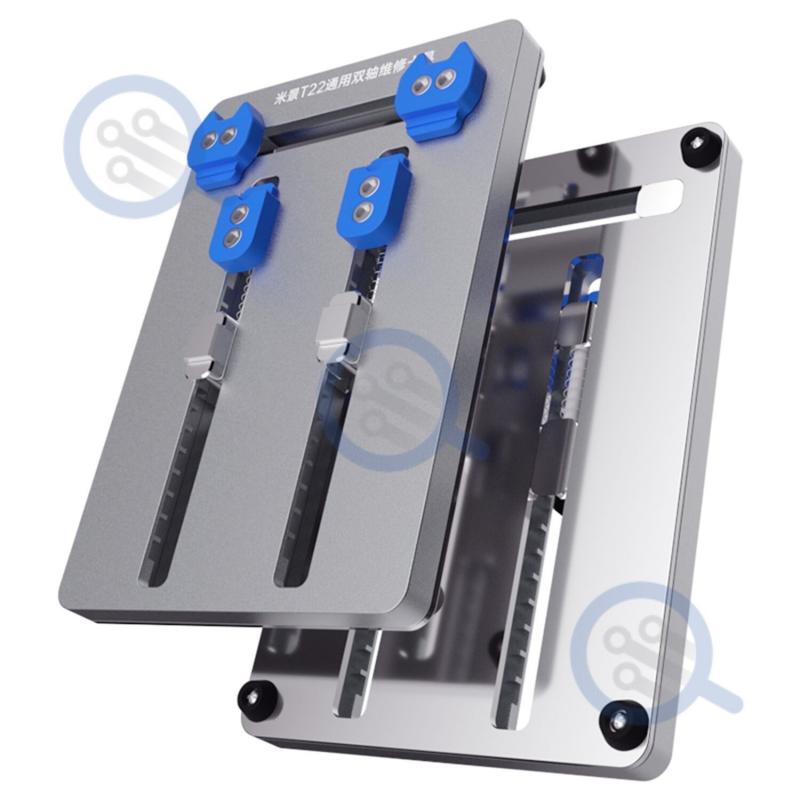
Mijing T22 Dual-Locking iPhone Logic Board Holder
$31.99 Hakko C1390C OMNIVISE PCB Holder Stand with 4 Settings
3V~36V 4A 144W Universal Power Supply 3V 5V 6V 9V 12V 15V 18V 20V 24V 30V 36V Adjustable Variable Switching AC/DC Adapter, 100V-240V AC to DC Converter with 14 Tips & Polarity Converter & Test Lead
$28.99 DIYPHONE Multipurpose Phone Current Test Cable DC Power Supply Dedicated Cable for iPhone 6 6S 7 8 X XS 11 12 13 14 15 pro max Motherboard Repair DC Power Cable
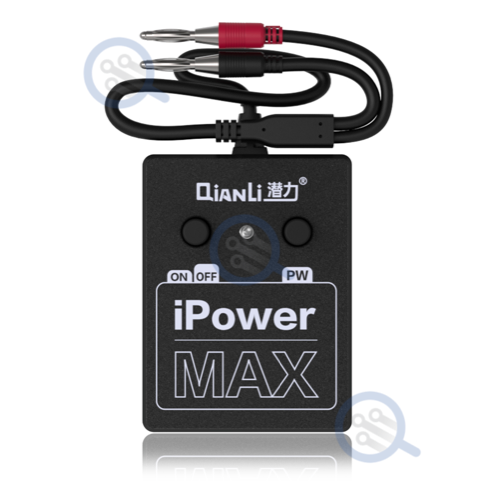
Qianli iPower Max iPhone 6 6P 6S 6SP 7 7P 8 8P X XS Xs Max DC Power Supply Cable
$24.99You can also check our page listing the essentials of micro soldering.
That’s about all for now. You’ll acquire a bunch of things along the way — some useful and some not so much. Don’t forget to buy some good tips for your soldering iron and maybe a fume extractor. Good luck!
attenhotairamzn